Once your sales rep has shared preliminary designs with the homeowner and closed the deal (nice job!), it’s time to conduct a solar site survey. This ensures that the preliminary design is feasible by confirming measurements and obtaining other relevant information required to plan the project.
The majority of a site visit is performed externally, meaning on the outside of the property, and can be done manually or remotely. If you’re doing manual site visits, this is when you’ll send an inspector up on the roof to double-check everything.
But if you (or your company) uses remote technology to perform site surveys, you may have the option to pull roof data based on high-res aerial imagery. And this method can be particularly effective at reducing the time from sale to installation.
So, we’re going to walk through the entire process of performing a residential site survey, whether you’re doing it manually or remotely. Here’s an overview of the steps involved:
- Gather information
- Pull satellite or aerial imagery
- Get prepared
- Assess the condition of the roof
- Take measurements and note obstructions
- Perform a shade analysis
- Take photos
- Assess the electrical system
- Gather information for structural analysis
- Upload info and photos to your system
What’s a solar site survey?
A solar site survey is an inspection of a property where solar panels are going to be installed, typically occurring after a sale has been closed. The crux of doing a site survey is to ensure that the preliminary design is feasible in order to create a permit-ready plan.
As we mentioned above, the external site survey can be done by either physically inspecting the property or by using remote technology. Other parts of the survey may need to be done in-person, depending on available property information.
What information do you need to gather from a site survey?
The information you collect during a typical site survey is what you’ll use to take your preliminary design and turn it into a permit-ready plan. Usually, here’s what contractors need to gather from the survey:
- Roof measurements and data including pitch and azimuth
- Solar exposure through shading analysis
- Visual inspection of roof conditions and obstructions
- Information about the electrical system to determine interconnection methods
- Structural information like rafter size and spacing
10 steps to do a solar site survey
Now we’ll go over the most important steps in a solar site survey — covering everything you need to know to get the job done right, even if you’re doing it for the first time.
Step 1: Gather information
First things first, you need to gather all the pertinent information about the property. This includes basic things like the street address along with local utility and permitting details.
 Image credit: bluewatercustombuilders.com
You’ll also want to have the preliminary design and contact on hand. This helps to understand the details and limitations of the proposed project along with wants and needs specific to the homeowner.
If you’re doing the survey in-person, you’ll then need to coordinate with the homeowner to schedule a time to come out to the property. Depending on how your business works, you may also need to coordinate this time with project engineers, designers, roofing contractors, or other contributors. If you’re doing the site survey remotely, you can share the report with all of these team members to collaborate and work as efficiently as possible. And, unlike external on-site surveys, remote surveys are not dependent on daylight hours.
Step 2: Pull satellite or aerial imagery of the property
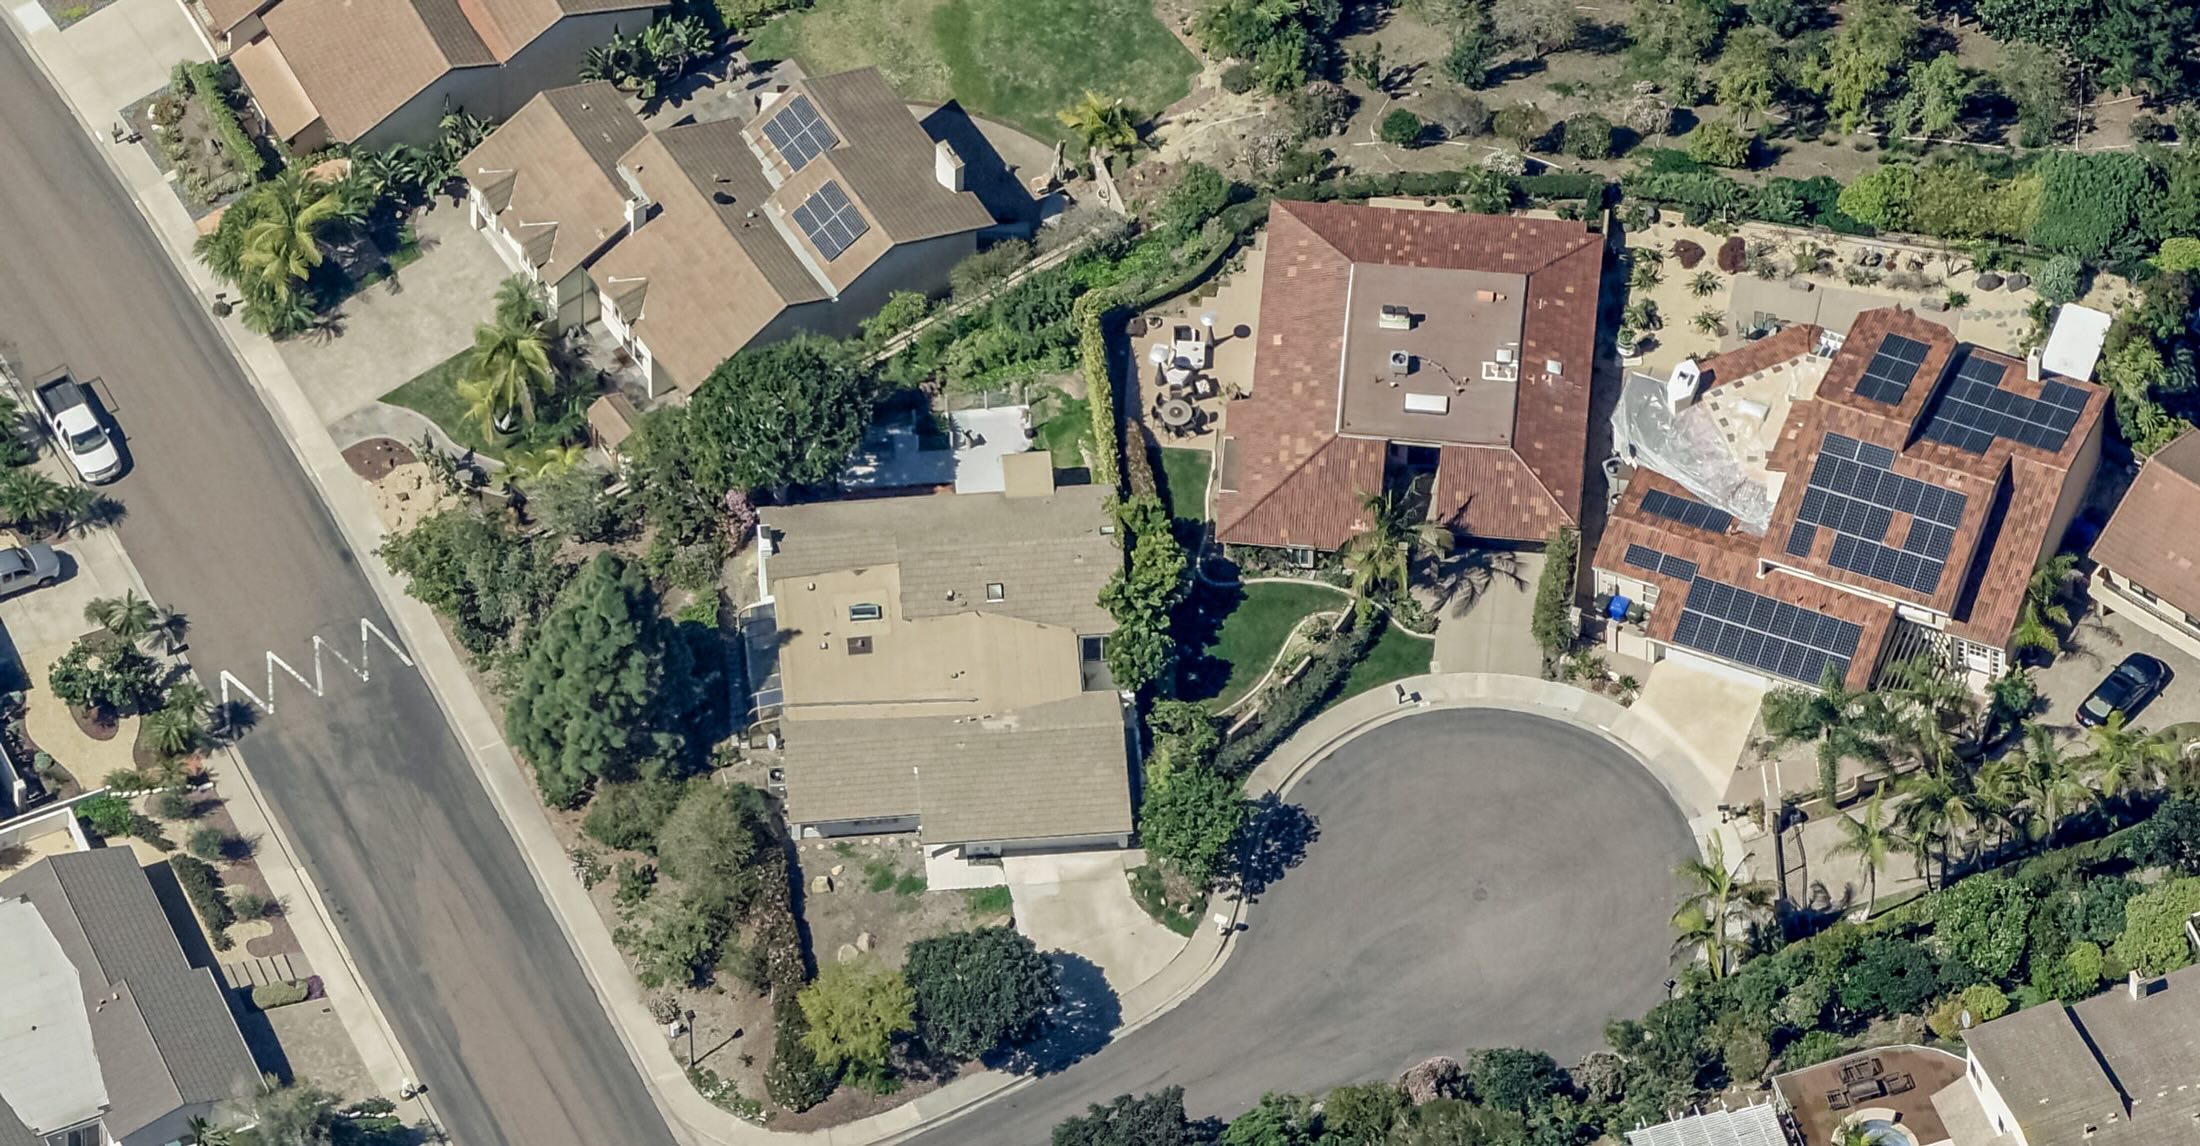
The next step in a solar site survey is to pull satellite or aerial imagery of the property to make some preliminary assessments and determine roof access points and limitations.
As far as satellite vs aerial imagery, it depends on what you’re looking for and how you conduct your site surveys. If you just want to take a quick look at the roof before heading out to the site, satellite imagery is going to be fine. And you can access satellite imagery for most properties for free using Google Earth.
However, if you want to see the roof in detail and use the imagery to get accurate measurements, aerial photography is the better option. Eagleview's high-resolution aerial imagery, for example, provides up to 140x the detail of satellites.
Step 3: Get prepared
 Image credit: Glenn Carstens-Peters via Unsplash
If you do need to head out to the site, make sure to gather all the necessary supplies and tools so you don’t have to make another trip. Here’s a quick checklist to go over each time you load up:
- The solar project contract or preliminary design
- Measurement tools - tape measures, laser distance meters, and open-reel fiberglass tape.
- Shade assessment tool
- Phone or camera
- Ladder
- Appropriate PPE (personal protective equipment)
- Brochures or sales material
- Laptop or tablet
- Business cards
- Pencil and clipboard
Step 4: Assess the condition of the roof
Whether you’re on site or using aerial imagery, the first thing to do is assess the condition of the roof, including how many layers of asphalt shingles are there. This is critical because the roof needs to be in good enough shape to support the installation of the solar system.
 Image credit: zillow.com
It also needs to be new enough so it will last a while — like for the next 25 to 30 years (the average lifespan of solar panels).
Otherwise, the panels will have to be removed when it’s time for a new roof and then replaced. With that in mind, a general guideline is asphalt shingle roofs should be 10 years old or less and in good condition before beginning solar panel installation.
Author’s note: As you can see, roofing and solar panel installation go hand in hand. So if you’re in the solar business already, it makes sense to offer roofing along with it (and vice versa). Once you add roofing to your business offerings, you can then cross-sell new roofs to solar customers. This profit-driving strategy also adds convenience for the customer who won’t have to find two separate contractors to get the job done, often leading to delays and cancellations. Eagleview’s Inform Essentials+ and Advanced include all of the information needed to quote, plan, and order materials for a roofing project alongside the solar installation.
Step 5: Take roof measurements and note obstructions
Once you’ve evaluated the condition of the roof, the next step is to get precise measurements. If you’re doing this manually, you’ll need to climb up on the roof and measure everything on the roof surface to determine the allowable solar module area.
You’ll also need to calculate the roof area and pitch, as well as note any obstructions like chimneys and skylights. When doing so, it’s generally a good idea to pick one corner or edge of the building as your reference point and measure all obstructions relative to that spot. This makes it easier for engineers and drafters down the road to accurately translate the information into their CAD program. Author’s note: If you want to perform your external site survey remotely (maybe using a product like Eagleview’s Inform Essentials+ or Advanced) you can skip this step entirely. Accurate roof data like measurements and calculations will be delivered straight to your desk.
Step 6: Perform a shade analysis
The next step is to perform a shade analysis. If you’re on site, take note of any nearby trees or buildings that are taller than the roof. Next, use a hand-held device such as the Solmetric Sun Eye or Solar Pathfinder tool to collect data points across the roof. Readings should at least be taken on every roof facet; at least one in each corner and one in the middle.
When recording the data from the readings, be careful to label the location of the reading correctly. Also be sure that the device is level when you’re using it — as either of these factors can substantially affect the results.
(Note: For many geographies, shade analysis taken in the winter can vastly differ from the summer in the same location given the lack of foliage in the surrounding shade scene.)
If you’re doing the survey remotely, you can use a product like Eagleview’s Inform Advanced to acquire solar access value (SAV) calculations. Unlike handheld devices that collect a handful of data points on a roof and can vary based on the user, Eagleview’s technology consistently captures thousands of data points.
“Eagleview is enabling us to significantly reduce time spent completing exterior site assessments, which means we can shorten project lifecycles and streamline our existing operational processes,” said Robert Bessler, Executive Director of Solar Operations at Semper Solaris.
“And with accurate 3D models and solar access values, we can also design systems that maximize energy production for our customers. We see the Eagleview Inform™ Advanced report as being a key component to help us continue growing our business.”
Step 7: Take photos of everything
If you’re doing your survey in-person, it’s important to take photos of everything. This will help the engineers and planners get a better idea of the project during the final design phase.
When doing so, take care to get pictures from both close-up and far-away. Close-up pictures are essential for noting details, especially of things like the electrical system. But pictures from far away are also important because they show the designers the layout and other constraints they may be working with.
Here’s a general list of photos you’ll need. (And remember, it’s always better to have too many pictures rather than not enough.)
- Front of the building, including house number
- South side of house (from south looking north)
- South yard (From north looking south)
- Roof or array location
- Areas of roof that need repair or present concern
- Any obstructions on the roof
- Roof pitch (get profile for pitch angle)
- Electric meter (be sure to get the meter number clearly in the picture)
- Main electrical panel, from far away and up close with door open to see the breakers and equipment label
- The transfer switch if one is present (typically used with whole home generators)
- Interior walls where equipment will be located (like inverters or batteries)
- Roof structural members in the attic, be sure to take a complete view in the attic to capture any knee walls or other members which would effect the structural analysis
- Any potential problems or issues
- Any other photo requirements from your specific organization
Step 8: Assess the electrical system
Another important area that needs to be assessed during a site survey is the home’s electrical system. This will determine how the solar system will be interconnected to the home's electrical system and may inform equipment selection and/or required upgrades.
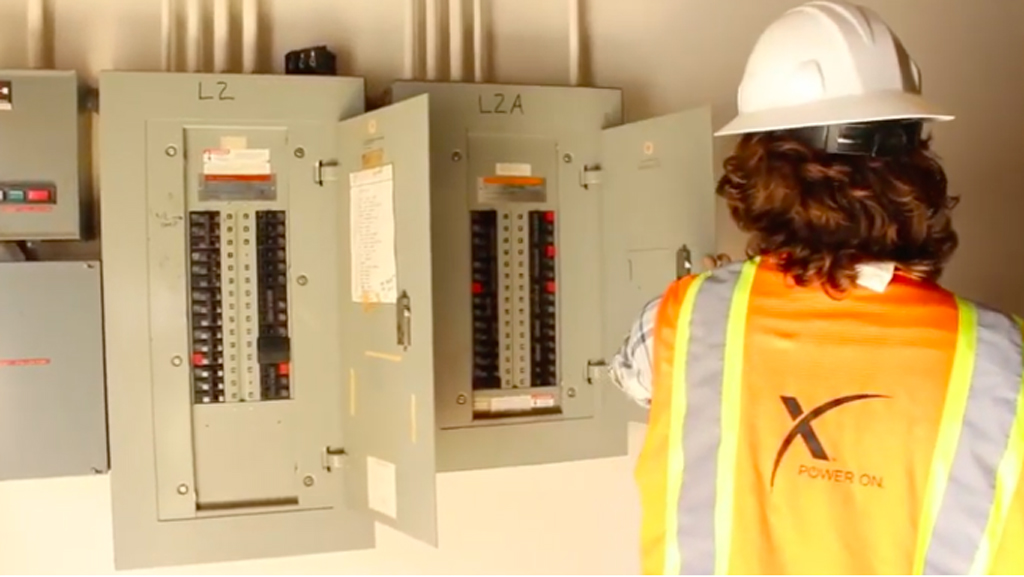 Image credit: Sepi Solar
When inspecting the electrical system in person, make detailed notes and take clear photos. You’ll want to get close-up photos that show the nameplates and specifications. And also some from a distance to show the designers the space that’s available. Here’s a checklist of electrical items to assess:
- Electric meter close-up (include utility meter number)
- Main disconnect location
- Electrical panel location and sub-panels (if applicable)
- Electrical panel circuit breakers
- Transfer switch if one is present
- Proposed inverter and battery location
- Possible locations for running conduit
- General locations of proposed electrical equipment
Step 9: Gather info for structural analysis
The next step in the site survey process is to gather information required for the structural analysis. The structural analysis will identify if the existing structure can bear the load and counter the potential uplift of a retrofit solar system.
For this step you’ll need to note the type of structure and whether the roof uses traditional framing with rafters or a truss. You’ll also need to note the structural member size, along with the spacing and span for each roof facet that will be used for solar.
Authors Note: Eagleview’s Inform Essentials+ and Advanced products provide the maximum rafter span per roof facet which can eliminate some of the information that has to be gathered on site
Step 10: Upload information and photos to your system
 Image credit: Sigmund via Unsplash
If you’re doing the survey manually, the final step is to take all the information and photos you gathered at the property and upload it into whatever system your company uses.
Typically this gives the other members of your team access to the site survey information so they can move ahead with the design and permitting process.
If you’re using remote technology to complete your external site survey, this is another step that can be skipped.
Conclusion
As you can see, there’s quite a bit of information gathered during the site survey. Here’s a quick roundup of the 10 steps in a solar site survey:
- Gather information and schedule the appointment
- Pull satellite or aerial imagery of the property
- Get prepared
- Assess the condition of the roof
- Take roof measurements and note obstructions
- Perform a shade analysis
- Take photos of everything
- Assess the electrical system
- Gather information for structural analysis
- Upload information and photos to your system
Want to eliminate exterior site surveys? Eagleview can help
Eagleview’s solar products like Inform Essentials+ and Advanced help contractors go from sale to install faster by eliminating the typical exterior site survey process.
A representative at SunPower explains that “Eagleview reports help us to eliminate in-person site surveys and shorten project lifecycles by up to two weeks. Everyone wins: homeowners go solar faster, our dealers avoid an additional site visit, and we reduce project overhead.”
What Eagleview does to help
Eagleview compliments or eliminates your site survey process, delivering the external roof data you need to plan a solar project quickly. We help contractors with the following:
- Comprehensive remote measurement solutions, including pitch, azimuth, and remote shade analysis.
- Design solutions that allow you to create precise digital models instead of drawing over 2D images and estimating the size and location of obstructions.
- Determine optimal panel placement for solar energy production based on solar access values derived from sophisticated shade analysis.
- Create proposals, permit sets, and project plans faster with digital file exports for popular design programs.
Try Eagleview’s aerial imagery tool to get fast, accurate roof measurements — no ladder required. Learn more about Eagleview’s imagery tool.
Author
Peter Cleveland
Vice President, Solar
Pete began his solar career in 2010 where he initially focused on developing and implementing system design standards and processes leveraging his previous experience in land surveying and heavy site construction. Before joining Eagleview in 2018, Pete drove innovation and efficiencies with one of America’s largest EPC’s by combining LEAN business practices with technology. Today, as the Vice President for Eagleview’s solar business, Pete is continuing to pursue his passion of evolving the solar industry by applying technology to solve real world problems in an effort to deploy more solar for the benefit of society and our planet as a whole.